Categories
i'm Maggie
Your average Canadian, who loves hot tea, hates socks and helping your business have a show-stopping brand and website
Branding
Design
Websites
About Maggie
Adding SVG To Website
Want to learn a Showit SVG Trick?
Did you know that the elements on a website should not be PNGs? Especially your design elements?
The design elements you see in the background of my site should be an SVG—or scalable vector graphics. These are images that can be rendered at any size and not get blurry as a PNG or JPEG could when it is compressed. Vector graphics allow you to scale it to any size while it still remains true to it’s original design.

So if you want a web designer to add in fun design elements—like my teacups or swirls—you’ll want to make sure your designer either has the Adobe Illustrator file of your brand elements so they can turn them into SVG files, or you send them the SVG files.
That way whatever size screen your website is on the elements won’t get stretched and pixelated.
How To Make an SVG
First, you will need access to Adobe Illustrator. Then you will need to make sure your document settings are set to digital/ RGB colour settings.

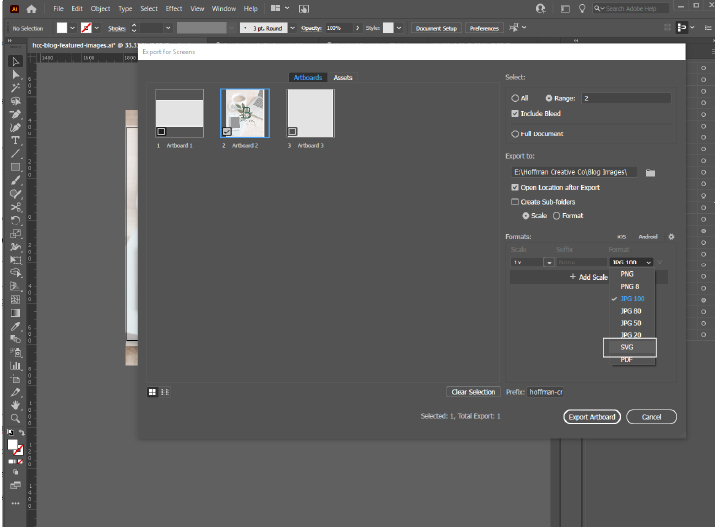
Next, you will design or create graphics or illustrations that you want included on your website. Once you are complete, go to File > Export > Export for Screens. In the dialogue box that pops up go over to the right menu in Formats and select the drop-down > SVG. This is an easy way to export your Artboard as an SVG.
Upload your SVG to your website media library and then ta-da! You can add that to your website pages. You will also not be able to preview them in your files like a JPEG or PNG, so make sure you rename it well (and with the colour you’re using too).
Showit SVG Trick
If you are designing your website on Showit, here is a fun trick to adjust your SVG colours without having to upload all your brand colour options.
First, you will need to have your SVG illustration files (follow the steps above). Then follow these steps:
- Google svgomg (and it will redirect you to a jakearchibald site—don’t worry, you want to be there).
- Upload your SVG file then select the Markup tab

3. Copy that HTML Code and hop over to Showit
4. Then in Showit add an Icon to your Canvas. To do this, go to the footer navigation and select the middle button > Icon.

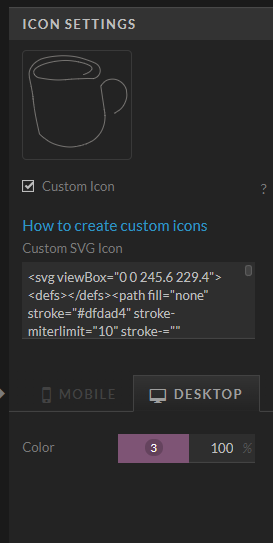
5. Go over to the right menu > select Icon Settings > Check the Custom Icon box > insert the HTML you copied over from SVGOMG

You can now adjust the size of the icon to whatever position and change the colour of it! I also find it helpful to rename it from Icon in the left side menu so you know what you’re working with.
**Some SVGs have a lot of code, and Showit has a code limit. If you run into that, then you will need to upload your SVG files to the media library and insert them into the page that way.
Another Tip
As an extra tip, I save that code to my files in a notepad so I can reference it easier than trying to remember what page I used it on and searching for it.
Did you know this trick?! Tell me in the comments if you want any more tips for your Showit website👇🏻